RECIPES AND MORE FROM AN URBAN KITCHEN

Thursday, March 31, 2011

Make the Sun Rise in Time


I heard a rumor today that NYC won't get above 60 degrees for all of April. If this prediction comes true, desperate measures may have to be taken. Like moving to California, for example. In all seriousness, I'm getting to the point where all of my winter clothes just look drab and tired and I can't bear to do ONE MORE POST in which I'm wearing a sweater and tights. I just can't.

So here's some spring inspiration for you instead. After months of wearing camels and greys and black, I'm excited to liven it up a bit with a hit of neon. Better yet, neons (plural) worn together, as is the case above. Doesn't all the color cheer you up a bit? Hey, if it can't be spring in real life, at least I can fake it on this blog. All pictures by Mark Iantosca. Click through and check out his snazzy new site. xo

Tuesday, March 29, 2011

Mexican Breakfast


A few years ago, I took a little trip to Playa del Carmen with a friend for some serious relaxation. My memories of the trip have since devolved into a warm, hazy blur of sun, ocean dips, strong margaritas, and lots of reading, but one thing that I've always remembered clear as day is the breakfast dish I ate every single morning while we were there. It was a strange little conglomeration of crispy tortilla, eggs, and bright green cilantro served piping hot and sprinkled with a crumbly white cheese; so simple, yet so incredibly good. I actually mourned it's absence when I got back home, never thinking to try making it myself.

I was so surprised, when flipping through David Tanis' cookbook, Heart of the Artichoke and Other Kitchen Journeys (a lovely birthday gift from Michelle, our edit director at CA Creative), to find a recipe for the exact dish I remember so well. Tanis calls it chilaquiles, and his version of it is even better than the ones I had in Mexico. In fact, I was so happy to be reunited with it, I whipped it up no less than three times over the weekend. And I'll probably have it for dinner tonight. xo

Mexican Breakfast (or Chilaquiles)
Adapted from Heart of the Artichoke and Other Kitchen Journeys, by David Tanis
Ingredients:
4 corn tortillas, cut into strips
Big handful of cilantro, chopped
1/4 cup of scallions, chopped
1 small green jalapeno, chopped
2 eggs
Salt and pepper
Queso fresco, for crumbling

Directions:
Heat a cast-iron skillet, add a little vegetable oil, add the tortilla strips and a little salt, and stir to coat them. The tortilla strips will wilt, then crisp, which is what you want. Throw in a big handful of chopped cilantro, scallions, and chopped jalapenos, and stir them around.

Now add 2 beaten eggs seasoned with salt and pepper. Mix and stir the eggs with the tortillas until the eggs are set. Finish the chilaquiles with a little crumbled queso fresco.

Monday, March 28, 2011

Birthday Cake


It was my birthday on Friday, and I had so much fun with all of my friends that I didn't take a single picture. Luckily, Harry Beee snapped this one as I was blowing out my birthday candle. I grabbed a bite to eat at home-away-from-home, Soho Grand Hotel, with a bunch of friends for a big, cozy, yummy dinner, then hung out in the Club Room for the remainder of the night.

Among my birthday gifts? Lots of cookbooks, a psychic reading, a tooth necklace (a funny tribute to the chipped tooth incident of last week), and a pasta-making class. My friends know me so well. xo

The other picture of the night (there were only two!) taken with David's blackberry. Emerson, Kristian, me, and David outside of the Soho Grand.

Thursday, March 24, 2011

Fried Zucchini Spaghetti


When I was in college, I had a friend named Dave who would bring me home to his parent's house sometimes to hang out and get some good home cooking. Although his entire family was made up of extraordinary cooks (his dad owned restaurants), my absolute favorite thing to eat there was the simplest little snack his housekeeper would make just to whet our appetites until the real meal was served. She would quickly slice up some zucchini into thin little slivers, toss them around in a bit of flour, then lightly fry them and serve them up sprinkled with a touch of sea salt. For some reason, it was the best thing imaginable.

So when I saw an article in the April issue of Food & Wine about Gwyneth Paltrow's soon-to-be-released new cookbook (which, by the way, I've had pre-ordered for over a month now), along with her recipe for fried zucchini spaghetti, I made it that very day. And lo and behold, just like the hot, crisp zucchini slices I remember from 10 years ago, the dish is light and comforting and way more delicious than it should be, considering how easy it is to put together. And just look at it. Doesn't it look like summer on a plate? xo


Fried Zucchini Spaghetti
From Food & Wine, April 2011
Ingredients:
1 pound small zucchini, very thinly sliced crosswise
1/4 cup all-purpose flour
Salt
1/2 cup plus 2 tablespoons extra-virgin olive oil
3/4 pound spaghetti
1 cup shredded Parmigiano-Reggiano cheese, plus more for serving
1/2 cup torn basil leaves
Freshly ground pepper
Lemon wedges, for serving

Directions:
In a medium bowl, toss the zucchini with the flour and a pinch of salt. In a very large skillet, heat half of the oil until shimmering. Add half of the zucchini and fry over high heat, turning once or twice, until browned and crisp, 3 to 4 minutes. Using a slotted spoon, transfer the zucchini to a paper towel–lined wire rack and season with salt. Repeat with the remaining oil and zucchini.

Meanwhile, cook the spaghetti in a large pot of boiling salted water until al dente. Drain, reserving 1/2 cup of the pasta cooking liquid. Return the pasta to the pot and toss with the 1 cup of cheese, the basil and a generous pinch of pepper. Add the reserved pasta water a little at a time, tossing well to coat. Transfer the pasta to a bowl and top with the crispy zucchini. Serve right away with lemon wedges and additional cheese.

Wednesday, March 23, 2011

Simple Almond Biscotti


Is there anything better than starting your day with a cup of strong coffee and a perfect piece of crumby, crunchy biscotti fresh out of the oven? Not much. Anyone who's ever made their own homemade version of this Italian cookie should be able to attest to the fact that the packaged kind they sell at the register in Starbucks just can't compare. (Surprise, surprise.)

Even though it's one of my favorite breakfast treats, I'd never attempted it on my own until I read a recipe for it straight through and realized how incredibly easy it is. They're the perfect little things to wrap up prettily and hand out to all your friends as impromptu gifts. And if you happen to want to keep them all to yourself? They'll stay fresh for up to a week. They'll even taste better a day or two later. Recipe down below. All pictures by Mark Iantosca. xo


Simple Almond Biscotti
From Gourmet Italian Kitchen, Adapted from Tony Oltranti
Ingredients:
1 cup sugar
1 stick unsalted butter, melted
3 tablespoons brandy
2 teaspoons pure almond extract
1 teaspoon pure vanilla extract
1 cup whole almonds with skin, lightly toasted, cooled, and coarsely chopped
3 large eggs
2 3/4 cups all-purpose flour
1 1/2 teaspoon baking powder
1/4 teaspoon salt


Directions:
Stir together sugar, butter, brandy, and extracts in a large bowl, then stir in almonds and eggs. Stir in flour, baking powder, and salt until just combined. Chill dough, covered, 30 minutes.

Preheat oven to 350 degrees with rack in middle. Using moistened hands, halve dough, and form 2 (16-by-2-inch) loaves on an ungreased large baking sheet. Bake until pale golden, about 30 minutes. Carefully transfer loaves to a rack and cool 15 minutes.

Cut loaves into 3/4-inch slices with a serrated knife. Arrange biscotti, cut side down, on a clean baking sheet and bake until golden, 20 to 25 minutes. Transfer to rack to cool.

Tuesday, March 22, 2011

David Eyre's Pancake


Every once in a while, a recipe comes along that has the power to deceive. This is one of them. These pancakes come billowing out of the oven in all their lemony, sugary, light-as-air fanfare and make you look like some kind of culinary genius; like someone who scoffs at normal pancake recipes, insisting upon something better and fancier and altogether more consequential. In actuality, this is just about as easy as recipes get. Seriously. Get your cast-iron out and make these immediately. You probably have everything you need right in your pantry, and you'll be rewarded with a sweet, tart, lightly toasted thing that's somewhere between a pancake and a crepe.

They're excellent for a lazy Sunday breakfast date with someone you'd like to impress. Mix up the batter while he's out grabbing the papers, pop it into the oven, and by the time he's stepping back over that threshold, you'll be lifting it out of the oven, apartment smelling divine, without looking like you batted an eyelash. xo

David Eyre's Pancake
Adapted from The Essential New York Times Cookbook, by Amanda Hesser
Ingredients:
1/3 cup all-purpose flour
1/2 cup whole milk
2 large eggs, lightly beaten
Pinch of freshly grated nutmeg
4 tablespoons unsalted butter
2 tablespoons confectioner's sugar
Juice of 1/2 lemon

Directions:
Heat the oven to 425 degrees. Combine the flour, milk, eggs, and nutmeg in a bowl. Beat lightly. Leave the batter a little lumpy (don't overmix the batter or your pancake will be tough).

Melt the butter in a 12-inch skillet with a heat-proof handle (cast iron works best here). When it is very hot, pour in the batter. Bake for 15 to 20 minutes, until the pancake is golden brown.

Sprinkle with sugar and return briefly to the oven for just a minute or two. Sprinkle with lemon juice, and serve with jelly, jam, or marmalade.

Monday, March 21, 2011

Weekend Bits: What I'm Reading


I spent the entire weekend hiding out in my apartment because of an unfortunate Friday accident during which I tripped, fell, and proceeded to chip a tooth. I guess I still haven't grown out of my teenage "clumsy" phase. Sigh. Of course, my dentist wasn't around until this morning, so I had an excuse to loll around the apartment, read, take in lots of Friday Night Lights episodes, and cook. It actually ended up being a nice break from...well...everything. Plus it gave me a chance to really get caught up on the growing pile of cookbooks I've been meaning to sink my teeth into (no pun intended).

I highly recommend all of the books pictured above (picture by Mark Iantosca). From top to bottom:

1. Keys to Good Cooking: A Guide to Making the Best of Foods and Recipes, by Harold McGee, $35, at barnesandnoble.com
2. Canal House Cooking, Volume No. 5, by Christopher Hirsheimer and Melissa Hamilton, $19.95, at canalhousecooking.com
3. A Bird in the Oven and Then Some, by Mindy Fox, $24.95, at amazon.com
4. Pretty Delicious: Lean and Lovely Recipes for a Healthy, Happy New You, by Candice Kumai, $30, at barnesandnoble.com
5. Barefoot Contessa: How Easy is That?, by Ina Garten, $35, at barnesandnoble.com

Friday, March 18, 2011

Beauty Shop: Elizabeth Arden Eight Hour Cream Intensive Moisturizing Hand Treatment


I cook so much that sometimes I feel like I spend my life doing dishes. I probably wash a sinkful just about every single day, and as you can imagine, that doesn't bode well for the state of my hands. I've yet to find an effective dishwashing detergent that somehow manages not to suck all the moisture out of my skin, and I have a sneaking suspicion that it's not forthcoming anytime soon.

The next best thing? My Elizabeth Arden Eight Hour Cream Hand Treatment. I'm obsessed with this stuff. Just like the original legendary formula, developed in 1930, it's like a miracle balm for the driest skin. I use the standard Eight Hour Cream on any super dry patches of skin and whenever I skin my knees (more often than you would think; I tend to err on the clumsy side), and I use the hand treatment right after I wash my dishes and at night before I go to bed. Give it a try and let me know what you think. You can't go too wrong with it, I promise. After all, it's been selling like hotcakes for almost a century now for a reason. xo

Picture by Mark Iantosca.

Thursday, March 17, 2011

Rich Beef and Barley Soup


Remember my soup-making streak? The one that lasted about a month in the dead of winter? That's one thing I'll miss about the cold--sometimes, there's nothing more comforting than putting on a big pot of soup and waiting for it to simmer itself to it's greatest potential. Judging from the almost-70-degree weather today, those days are quickly coming to a close (not that I'm complaining). We've got maybe another couple of weeks to take advantage of the lingering chill in the air and make our last batches of hearty soups and stews. Like this one here.

Ever since I was a kid, beef and barley soup has been one of my standard go-to elixirs. I order it at restaurants, ladle it into paper take-out containers at delis, and buy it by the pint at places like Whole Foods or Dean & Deluca. But I'd never attempted a homegrown version until I came across a recipe for it in Ina Garten's newest cookbook, How Easy Is That? In this iteration, Garten uses rich, fatty oxtails in place of regular stewing meat like beef chuck for a  broth that's flavorful and substantial. It steers away from the classic a bit, but is completely gratifying in it's own right, and the perfect thing to eat all week long when you're too busy to cook every night. Try it and let me know how you think it compares. xo

Rich Beef and Barley Soup
From How Easy is That?, by Ina Garten
Ingredients:

1 tablespoon good olive oil
2 lbs beef oxtails
2 cups chopped leeks, white and light green parts (2 leeks)
2 cups (1/2-inch) diced carrots (4 carrots)
1 cup chopped yellow onion
1 cup (1/2-inch) diced celery (2 stalks)
2 garlic cloves, minced
2 sprigs fresh thyme leaves
3 bay leaves
10 cups canned beef stock (Ina says she uses College Inn brand beef broth)
1 cup pearled barley
 
Directions:
Heat the olive oil in a large pot or Dutch oven, such as Le Creuset. Add the oxtails, 1 teaspoon salt, and 1/2 teaspoon pepper and cook over medium-high heat, stirring occasionally, for 10 minutes until browned all over. Remove the oxtails with a slotted spoon and reserve.

Add the leeks, carrots, onion, celery, and garlic to the fat in the pot and cook over medium heat, stirring occasionally, for 10 minutes, until the vegetables start to brown. Tie the thyme sprigs together with kitchen string and add to the pot along with the bay leaves. Return the oxtails to the pot and add the broth, 1 tsp of salt and 1 tsp of pepper. Raise the heat and bring to a boil. Lower the heat, cover and simmer for 1 hour. Discard the thyme bundle and the bay leaves, and skim off the fat.

Meanwhile, bring 4 cups of water to a boil and add the barley. Simmer uncovered for 30 minutes, drain, and set aside.

When the soup is ready, add the barley and cook the soup for another 15-20 minutes, until the barley is tender. Depending on the saltiness of the stock, the soup might need another teaspoon of salt and some pepper. serve hot, with or without the oxtails.
 
Cook's Note: I let the soup cool down quite a bit before adding in the barley, so that it would be easier to skim the fat off the top. It's important to get as much off as possible so you're not left with an oily soup. 

Wednesday, March 16, 2011

Who Put These Bodies Between Us


There's nothing like delving toe-first into a bit of exploratory Manhattan apartment hunting to convince yourself to stay just where you are for the next, oh, 17 years. The end of my lease is coming up in a couple of months so I thought I'd see what was out there--I needed more space, another closet, perhaps a proper bedroom, et al. Right. After traipsing around in the cold looking at a handful of inadequate apartments with a confused, inept broker this morning, my little downtown home looks absolutely perfect. And that's that.

On a brighter note, it's warm and sunny today! I can feel the winter thaw happening right under my feet, and it's putting the biggest smile on my face. It's only a (short) matter of time before we're all hitting the streets jacket-less, pants-less (with shorts on, of course), and exponentially happier for it.

But for now, I guess I better keep my pants on for at least a few more weeks. I'm wearing a Jen Kao tank, Lia Kes silk pants, Brian Atwood shoes, and a Smythson travel envelope I've decided to use as a clutch. All pictures by Mark Iantosca. Be sure to click over and check out all the amazing pics on his site. xo

Tuesday, March 15, 2011

Red Quinoa Salad with Roast Chicken, Tart Apple, and Fresh Basil


The first time I went to Peel's, here in NYC, I ordered up their red quinoa salad. Sounds like boring spa food, right? Negative. It was filled with creamy chickpeas, chunks of juicy black olives, and of course, loads of quinoa, my favorite ancient super grain. It was anything but boring, and in fact, it was probably the best thing I had that night (and I also had the shrimp and grits, along with the corndogs, so that's saying something).

Ever since, I've had it in my head as something to try to recreate at home, so when I came across a quinoa recipe in my current favorite cookbook, A Bird in the Oven and Then Some, by Mindy Fox, I shredded up some leftover roast chicken and gave it a go. This is probably the healthiest, tastiest, most refreshing salad I've ever made. It begs for a picnic blanket and a lazy, sun-flooded afternoon with friends. You can bet it's going to be on permanent rotation for me this summer. xo


Red Quinoa Salad with Roast Chicken, Tart Apple, Ground Pepper, and Fresh Basil
From A Bird in the Oven and Then Some, by Mindy Fox
Ingredients:
2 cups water
1 cup pre-washed red quinoa
2 cups small shreds roast chicken
1 Granny Smith apple, cut into 1/8-inch slices, then into 1-inch matchsticks
1/2 cup thinly sliced fresh basil leaves
2 scallions, thinly sliced on a long diagonal
6 tablespoons fresh lemon juice (from 2 lemons)
3 tablespoons extra-virgin olive oil
1 teaspoon fine sea salt
Freshly ground black pepper

Directions:
Combine the water and quinoa in a 1 1/2-quart saucepan and bring to a boil. Reduce to a simmer, cover, and cook until the water is absorbed, about 15 minutes. Spread the cooked quinoa on a large plate and let cool.

In a large bowl, toss together the cooled quinoa, chicken, apple, basil, and scallions. Add the lemon juice, oil, and salt, and toss once more. Season with pepper.

Monday, March 14, 2011

Weekend Bits

Another perfect manicure by the exacting technicians at Valley Nails. I decided to go for a black pearl color a la Chanel this time.

I spent the better part of this weekend relaxing, cleaning house, cooking, hanging with Suz Monster, and reading. Lately, that's pretty much my idea of a great time. I don't know if it's the end of winter blahs or maybe that I'm just sick of my cold-weather clothes, but I have almost no desire to go out at night these days. I'm sure I'll be singing a different tune once the evenings get warm enough for open-toed shoes and spring dresses, but for now, it's cozy dinner dates and early bedtimes for me.

I did manage to make it out for the big opening party of the new Mondrian Soho hotel, during which The Kills gave an awesome live performance. Totally worth the late trek in the rain. What did you do this weekend? xo

New books! Tiger, Tiger, by Margaux Fragoso; Room, by Emma Donoghue; Three Stages of Amazement, by Carol Edgarian; This Vacant Paradise, by Victoria Patterson. All highly recommended by the paper of record.

Jamie Hince (yes, Kate Moss' fiance) and Alison Mosshart of The Kills performing at the Mondrian Soho on Thursday night. Picture taken by Billy Farrell.

My new favorite Cacharel shorts that I can't wait to wear. I picked them up at Opening Ceremony. I'm in love with the print and the fact that they look like boardshorts.

I have a thing for hot, spicy potato chips. I discovered these Route 11 ones this weekend; they're made with some of the spiciest peppers around and they're delicious. Plus, look at that bag!

Thursday, March 10, 2011

Beauty Shop: Savon de Marseille Olive and Lavender Hand Soap


One of my favorite bathroom purchases is hand soap. My hands tend to get really dry, especially in the winter, so I always make sure to pick one that is good and moisturizing (there are few things I hate more than detergent-filled, drying hand soaps). Also, it's something that every single one of your guests looks at and uses, so it's important to invest in one that's both pretty and of the highest quality--believe me, your friends will appreciate it.

This one, made by Compagnie de Provence, called Savon de Marseille, is fantastic. I chose the olive and lavender scent, and it's turned me into even more of a frequent hand-washer than I already was. It's made with pure vegetable oils (moisturizing!) and contains no animal products or anything artificial, plus the bottle is simple and gorgeous.

I picked up my bottle at C.O. Bigelow, but you can also buy it online HERE for $23. Picture by Mark Iantosca. xo

Wednesday, March 9, 2011

Jean-Georges' Fried Rice


I have this thing for Mark Bittman. And by "thing" I mean I love him. Whenever I watch one of his NY Times videos, I think that that is exactly how I would want my future husband to be in about 20 years; namely, funny, charming, and a damn good cook. Anyway, when I saw his video for Jean-Georges' fried rice, I had to make it straight away. It's one of the simplest, most fuss-free recipes ever and absolutely perfect for those solitary nights when you want a homemade dinner for one without a lot of hassle. Also, by the time you stream the sesame oil over your finished bowl of rice, you have an end product that miraculously tastes almost exactly like the real dish Jean-Georges serves at his New York City restaurant, Spice Market. Heavenly. 

All pictures by Mark Iantosca. Recipe below. xo


Jean-Georges' Fried Rice
From The New York Times
Ingredients:
1/2 cup peanut oil
2 tablespoons minced garlic
2 tablespoons minced ginger
Salt
2 cups thinly sliced leeks, white and light green parts only, rinsed and dried
4 cups day-old cooked rice, preferably jasmine, at room temperature
4 large eggs
2 teaspoons sesame oil
4 teaspoons soy sauce 

Directions:
In a large skillet, heat 1/4 cup oil over medium heat. Add garlic and ginger and cook, stirring occasionally, until crisp and brown. With a slotted spoon, transfer to paper towels and salt lightly.

Reduce heat under skillet to medium-low and add 2 tablespoons oil and leeks. Cook about 10 minutes, stirring occasionally, until very tender but not browned. Season lightly with salt. Raise heat to medium and add rice. Cook, stirring well, until heated through. Season to taste with salt.

In a nonstick skillet, fry eggs in remaining oil, sunny-side-up, until edges are set but yolk is still runny.

Divide rice among four dishes. Top each with an egg and drizzle with 1/2 teaspoon sesame oil and 1 teaspoon soy sauce. Sprinkle crisped garlic and ginger over everything and serve.

Makes 4 servings.

Tuesday, March 8, 2011

We Were Gonna Live It Out


Thirteen days 'til spring. At this point, I'm seriously counting down. To me, spring always feels a little more like a fresh start than January 1st. For one thing, if the weather cooperates (fingers crossed), you get to toss the endless pairs of black tights you've worn every single day for 5+ months. That, alone, is reason enough to celebrate. Secondly, spring produce starts sprouting up at the farmers' markets, and suddenly things like asparagus appear again in your kitchen arsenal. And last but not least, a general feeling of hopefulness tends to permeate the city, making it's way into everything you do, from a walk to the corner bodega sans coat, to the first al fresco meal you take with friends. Everywhere you look, everyone has a special little bounce in their step, even the cool, apathetic New Yorkers here. It's time to shed the cold-weather layers, the winter weight. It's time to lighten up, to start over; time for a fresh perspective and new adventures. It's time to get going again. xo

I'm wearing an Elizabeth & James dress, APC fur jacket, Chanel bag. All pictures by Mark Iantosca.

Monday, March 7, 2011

Roast Chicken with Dijon Sauce


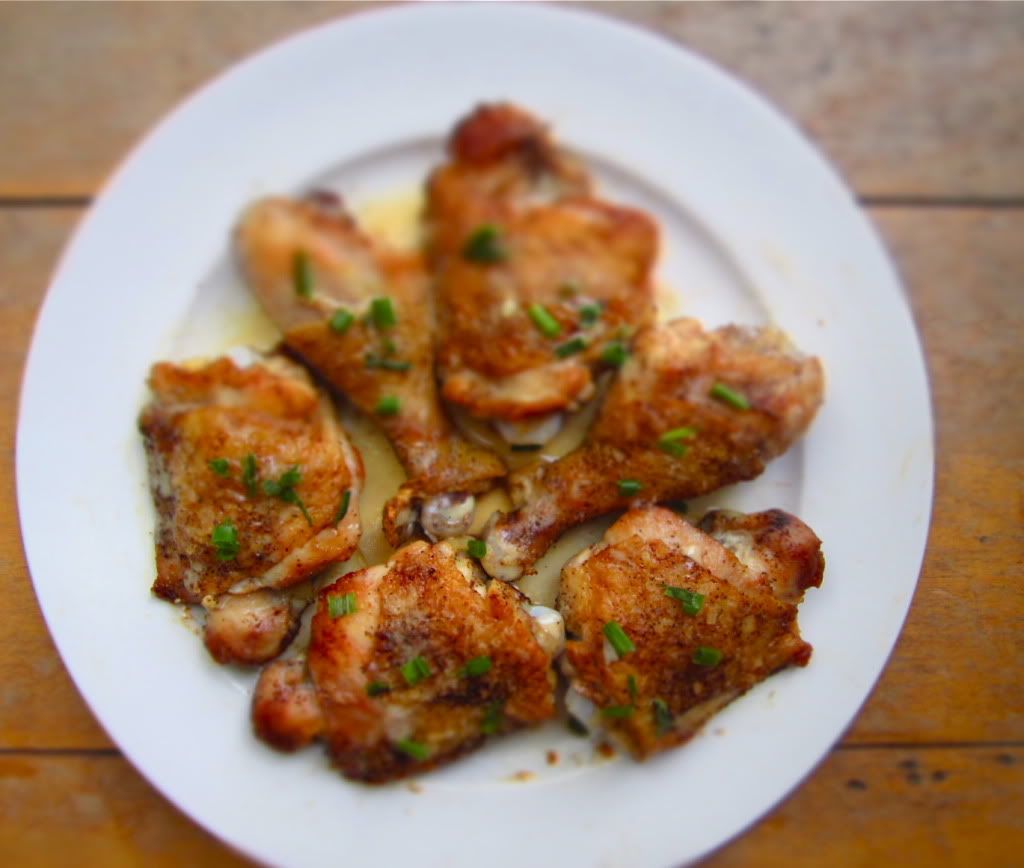
And so my chicken habit continues. This time, instead of roasting a whole chicken, I decided to switch it up (exciting, I know!) and roast 3 lbs worth of chicken legs and thighs, which are my favorite parts of the bird. I used a recipe I found on Smitten Kitchen for a smooth, silky Dijon sauce, and as soon as I took my first bite, straight out of the skillet, I knew that it was The One: my new favorite chicken recipe (this tends to change frequently, though).

The chicken is seasoned and then browned thoroughly before it's put into the oven for a short amount of time, producing a thin, crispy, deliciously salty skin that holds the juices in nicely. And then comes the sauce, which is, incidentally, one of the easiest, most brilliant things I've ever made. You scrape up the brown bits and chicken juices from the skillet, pour in some white wine and broth and boil it all together, finishing it with a bit of cream and swirls of Dijon mustard, which leaves you with a glossy, delicate sauce that packs quite a bite when poured over your chicken. It's divine. Plus, you get to sip on the extra white wine and pretend you're in a country kitchen somewhere in France while the concoction on your stove bubbles away--and with the heady way your kitchen will smell, you may as well be. xo

Roast Chicken with Dijon Sauce
From Smitten Kitchen
Ingredients:
3 pounds chicken parts (thighs, drumsticks, and/or breasts), with skin and bones
1 tablespoon vegetable oil
2 small shallots, thinly sliced
3/4 cup dry white wine
3/4 cup reduced-sodium or sodium-free chicken broth
1/4 cup heavy cream
2 tablespoons smooth Dijon mustard
1 tablespoon finely chopped chives or the green parts of scallions

Directions:
Preheat oven to 450°F with a rack in middle. Pat chicken dry and season generously with salt (I used Maldon sea salt) and freshly ground black pepper. Heat oil in an ovenproof 12-inch heavy skillet (if you’ve got a cast iron skillet, it is great here) over medium-high heat until it shimmers. Working in 2 batches, brown chicken, skin side down first and turning once, about 5 minutes per batch. I like to take a lot of care in this step, not moving the chicken until the skin releases itself and has a nice bronze on it, which will provide the best flavor and seal in the most juices.

Return all chicken, skin side up, to skillet and roast in oven until just cooked through, 15 to 20 minutes. Transfer chicken to a platter, then add shallots, wine, and broth to pan juices in skillet and boil, scraping up any brown bits, until reduced by half, 2 to 3 minutes. Add cream and boil until slightly thickened, about 1 minute. To thicken the sauce further, turn the heat to high and boil it until it reduces to a consistency you prefer.

Whisk in mustard, chives, and salt and pepper to taste. Serve chicken with sauce.

Friday, March 4, 2011

Homemade Girl Scout Cookies: Samoas


One thing about living in a big, fast-moving city like NYC--suburban staples like Girl Scouts are harder to find than a needle in a haystack. Every year, when Girl Scout cookie time rolls around, I find myself desperately searching for a random troop of Girl Scouts, which of course, I never find. So, I decided to take matters into my own hands this time and make them myself, starting with my favorite: Samoas.

I made the easier bar version (there was no way I was about to cut out little doughnuts with my dough) and they came out even better than the "real" thing--which, by the way, is loaded with bad ingredients like corn syrup, artificial flavors, and stuff I can't pronounce. The homemade variety, on the other hand, is all natural and way more delicious to boot. My little bars came out chewy and caramel-y and sweet--just the way I like them.

Homemade Samoas
Adapted from BakingBites.com
Ingredients:
Cookie Base:
1/2 cup sugar
3/4 cup butter, softened
1 large egg
1/2 teaspoon vanilla extract
2 cups all purpose flour
1/4 teaspoon salt

Topping
3 cups unsweetened shredded coconut
12-oz good-quality chewy caramels (I used Werther's Chewy Caramels)
1/4 tsp salt
3 tablespoons of milk
10 oz. good quality semisweet chocolate

Directions:
First, make the crust. Preheat oven to 350 degrees. Line a 9×13-inch baking pan with parchment paper. In a large bowl, cream together sugar and butter, until fluffy. Beat in egg and vanilla extract. Working at a low speed, gradually beat in flour and salt until mixture is crumbly, like wet sand. The dough does not need to come together.

Pour crumbly dough into prepared pan and press into an even layer. Bake for 20-25 minutes, until base is set and edges are lightly browned. Cool completely on a wire rack before topping.

Lower oven temperature to 300 degrees. Spread coconut evenly on a parchment-lined baking sheet (preferably one with sides) and toast 20 minutes, stirring every 5 minutes, until coconut is golden. Cool on baking sheet, stirring occasionally. Set aside.

Unwrap the caramels and place in a large microwave-safe bowl with milk and salt. Cook on high for 3-4 minutes, stopping to stir a few times to help the caramel melt. When smooth, fold in toasted coconut with a spatula. Put dollops of the topping all over the shortbread base. Using the spatula, spread topping into an even layer. Let topping set until cooled.

When cooled, cut into 30 bars with a large knife or a pizza cutter (it’s easy to get it through the topping). Once bars are cut, melt chocolate in a small bowl. Heat on high in the microwave in 45 second intervals, stirring thoroughly to prevent scorching. Dip the base of each bar into the chocolate and place on a clean piece of parchment or wax paper. Transfer all remaining chocolate (or melt a bit of additional chocolate, if necessary) into a ziploc bag with the corner snipped off and drizzle bars with chocolate to finish.

Let chocolate set completely before storing in an airtight container.