RECIPES AND MORE FROM AN URBAN KITCHEN

Monday, July 30, 2012

Quick Turkey Chili


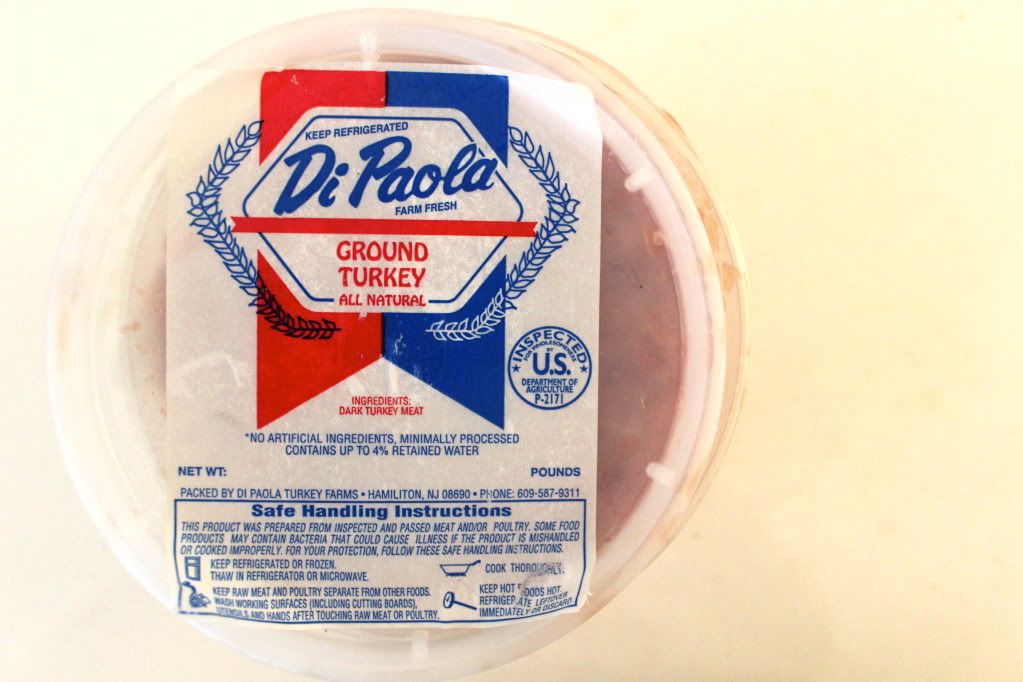
This weekend, I broke my stubborn streak of refusing to do anything in the kitchen besides lazily throwing veggies into the oven to roast. Instead, while leafing through my new copy of Dinner: A Love Story, by Jenny Rosenstrach, I stumbled upon what looked like a ridiculously easy recipe for one of my favorite comfort foods, turkey chili. The directions amounted to all of six short sentences and I had almost all of the ingredients in my fridge and my pantry already, so I got down to it after a quick run to the TriBeCa greenmarket for some freshly ground turkey.

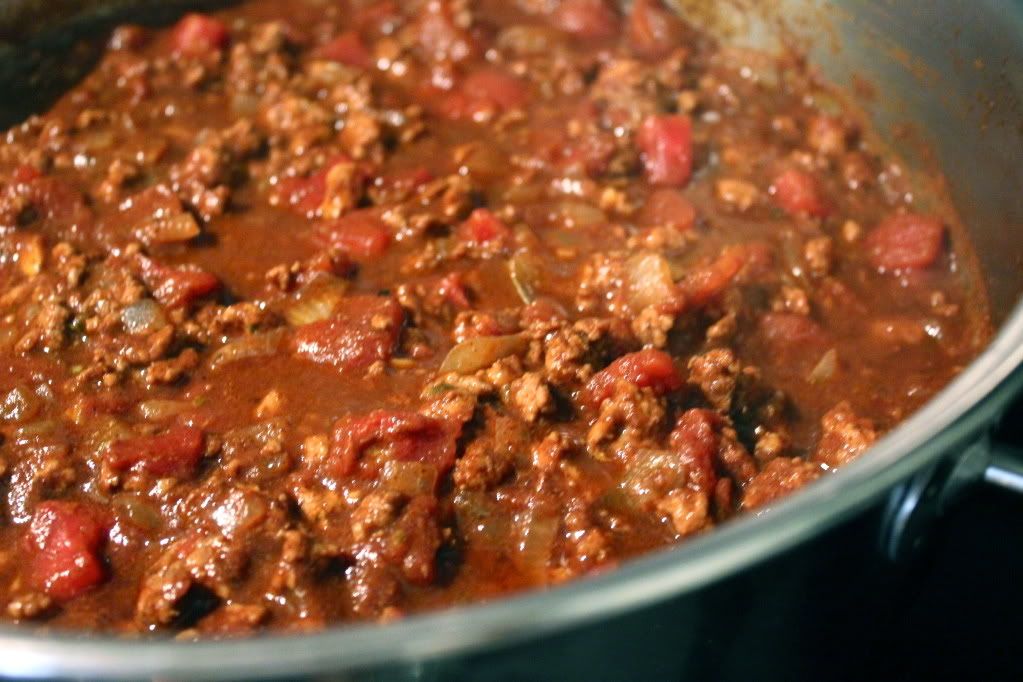
About 30 minutes later, I was sitting contentedly on my couch clutching a steaming bowl of seriously delicious turkey chili and eagerly perusing the book for more recipes like this one. The ease of the recipe really belies the goodness of it, which is pretty much quality numero uno in my list of things I want in all areas of life, but especially in my various stovetop projects. I've made a lot of turkey chilis in my day, but this one has just become my new go-to. Try it out! xo

Quick Turkey Chili
Serves 6 
Ingredients:
1 large onion, chopped
1 garlic clove, minced
Few glugs of olive oil
1 pound ground turkey (dark meat is always preferable) or beef
Salt and pepper to taste
4 tablespoons chili powder
1 28-ounce can diced tomatoes
1 teaspoon oregano
1/8 teaspoon cayenne
1 bay leaf
1/4 teaspoon cinnamon (crucial)
1 14-ounce can black beans, drained

Directions:
Over medium-low heat, sauté the onion and garlic in the oil about 3 minutes. Turn up the heat to medium-high and brown the meat until it loses its pink color. Add salt, pepper, and the chili powder—get it sizzly so the spices get cooking—and then add the tomatoes and the remaining spices.

Turn down the heat, simmer for 10 to 15 minutes, and add the beans. Cook for another 5 minutes, or until the beans are warmed through.

Serve with white or brown rice and any combination of the following: avocado chunks, shredded cheddar cheese, chopped fresh cilantro, sour cream.


Friday, July 27, 2012

Roasted Broccoli and Mushrooms


If you're a frequent reader of my blog, you're probably tiredly passing out right now, thinking "ANOTHER roasted veggie recipe?" Well, yes. But, this is less a new recipe, more my way of telling you to get yourself to a farmers' market this weekend, buy yourself some gorgeously golden Chanterelle mushrooms and some in-season broccoli, and make yourself a meal of it. Chanterelles, in all their bright golden-orange glory, are showing up at the markets in force right now, dirt still gently clinging to their stems, tasting faintly of flowers. It's a beautiful thing.

For a shot of greens, I added in a handful of healthy, tender broccoli (at it's best from now through November), coated all of it with some extra virgin olive oil, salt, and freshly ground black pepper and roasted the whole thing at 400 degrees for 20-25 minutes, making sure to stir it around about halfway through and check on it consistently to make sure it wasn't overcooking.

Happy weekend. xo

Monday, July 23, 2012

Cast Iron Pizza


Homemade pizza has been on my mind for what seems like years. I love the idea of making dough from scratch, waiting for it to rise, then having a few friends over and letting them choose their own toppings from a wide and varied array. In my mind, I picture balls of creamy mozzarella, a stack of freshly chopped basil, San Marzano tomatoes, thin sheets of prosciutto to drape elegantly across slices, a little bowl of red pepper flakes, maybe a mound of fresh straciatella or smoky ricotta if we're feeling luxurious. And of course, glasses of cold, bubbly prosecco making the rounds.

Sounds like the most awesome dinner party ever, right? But things have gotten in the way. For example, my irrational fear of yeast. My lack of a pizza stone or pizza peel. My innate distrust of any recipe that requires I wait around for 18+ hours for something to "rise." But as with anything seemingly difficult or scary that I really want, I've taken little baby steps toward the goal. I've taken it slow. Clipping various pizza recipes here and there. Ordering a pizza stone from Amazon (but not the pizza peel--not yet!). Studying up on Jim Lahey's famous no-knead dough. And this weekend, I finally took the plunge.

I got a little reckless with it. When I discovered that a pizza peel was pretty crucial to pizza-making with a pizza stone, I went rogue and decided to try it out with a cast iron pan. Instead of following one recipe to the letter, I combined a bunch of recipes to fit the equipment I have and the ingredients I like. And you know what? It turned out just fine. Better than fine--it was completely delicious. The crust was a great medium-thin thickness, chewy in the middle and crisp on the outside, and the simple combination of toppings I chose for my first effort were just right.

This recipe is great for summer, when you don't want to turn the oven to 500 degrees. All it takes is a flip of the dough on your stovetop over medium heat and a quick blast under the broiler. Give it a try and let me know how it goes. xo

Jim Lahey's Pizza Crust
Makes 2 balls of dough (enough for two 10-12-inch cast iron pizzas) 
Ingredients:
3 3/4 cups flour
2 1/2 teaspoons instant or other active dry yeast
3/4 teaspoon salt
3/4 teaspoon sugar
1 1/3 cup room-temperature water

Directions:
In a medium bowl, stir together the flour, yeast, salt, and sugar. Add the water and, using a wooden spoon or your hand, mix until blended, at least 30 seconds. The dough will be stiff, not wet and sticky. Cover the bowl tightly with plastic wrap or a damp towel and let sit at room temperature until the dough has more than doubled in volume, about 2 hours. If dough is slow to rise, stick it in your oven to make sure there are no drafts interfering with the moisture levels. Divide the dough in two and shape each into flattened balls. (Dough can be frozen at this point.)

Cast Iron Margherita Pizza
Makes 1 10-12 inch pizza
Ingredients:
1 ball pizza dough, rolled out for 1 10-12 inch pizza
1 tablespoon extra-virgin olive oil
1/2 cup crushed tomatoes
1/2 pound fresh mozzarella, torn into small chunks
1/4 cup fresh basil leaves, coarsely chopped or julienned
Red pepper flakes, to taste

Directions:
Preheat broiler. Add olive oil to a cast iron skillet set on medium heat. Add pizza dough to pan and cook until dough starts to bubble, about 1-2 minutes. Flip and immediately spread tomatoes with juice over top of the dough, leaving about 1/2 inch border. Lay down torn pieces of mozzarella. Let bottom cook, another minute. Transfer pizza in cast iron pan to oven and broil until cheese is melted but still a little runny, about 2 to 3 minutes. Sprinkle with fresh basil leaves and red pepper flakes, to taste.

Thursday, July 19, 2012

Summer Chicken


Everyone should have a go-to roast chicken recipe that they can build off of, and this one is mine. I found it years ago in a little book called Roast Chicken and Other Stories and I haven't really found a better basic recipe since. I love taking the chicken out about 15 minutes before it's done roasting and mixing a bunch of veggies into the delicious, lemony, smoking hot juices that have inevitably collected in the pan by that time. Give them a few swirls to coat them thoroughly, stick the whole thing back into the oven, and you've got a one-pan meal fit for company. The one in the picture above incorporates some sliced radishes, tender spring onions, and big chunks of summer garlic. Yum. xo

Summer Chicken
Serves 4
Ingredients:
1/2 cup good butter, at room temperature
3-4 lb organic free-range chicken
Salt and freshly ground black pepper
1 lemon
Several sprigs of thyme or tarragon, or a mixture of the two
6 garlic cloves, peeled
1 bunch radishes, sliced in half
1 bunch spring onions, sliced

Directions:
Rinse the chicken with cold water, remove the giblets, and pat dry with paper towels. Preheat the oven to 450 degrees Fahrenheit. Smear the butter with your hands all over the bird. Put the chicken in a roasting pan that will accommodate it with room to spare. Season liberally with salt and pepper and squeeze the juice of one lemon all over it. Put the herbs and the one garlic clove, crushed, into the cavity, together with the squeezed-out lemon halves. 

Roast the chicken in the oven for 10-15 minutes. Baste, then turn the oven temperature down to 375 degrees Fahrenheit and roast for another 30-45 minutes with occasional basting. About 15 minutes before the bird is done roasting, take it out of the oven, mix in the radishes, spring onions, and the rest of the garlic cloves and swirl around in the pan juices to coat. Stick the whole thing back in the oven for the remainder of the roasting time. The bird will be golden brown all over with a crisp skin and have buttery, lemony juices in the bottom of the pan. The veggies will be lightly roasted and delicious. 

Carve the bird as you like. With this roasting method, there's no need to worry about making a separate gravy--the juices in the pan is a perfect amalgamation of butter, lemon juice, and chicken juices and that's all you need. Give it a little whisk and you have the most wonderful gravy imaginable.

Tuesday, July 17, 2012

Seared Wild Salmon with Zucchini and Basil


Salmon has always been my favorite fish--it's incredibly easy to cook and when you get it right, the taste and texture are downright buttery. I've always heard that summer is the best time to buy wild salmon--something about how the fish build up lots of fat around this time of year in preparation to spawn. Not sure how pinpoint accurate my scientific reasoning is, but I do know that tastebuds don't lie, and if you spot some beautiful wild salmon (I try to stay away from the farmed stuff) you should snatch it up. It is, indeed, especially delicious right around now.

Here's a recipe from Cook This Now, by Melissa Clark, that's simple enough to let the flavor of the fish shine through. It also incorporates summer zucchini and basil, two more seasonal favorites that are ripe for the picking at farmers' markets right now. Pictures by Mark Iantosca. xo

Seared Wild Salmon with Zucchini and Basil
Serves 2
Ingredients:
2 thick wild salmon fillets (6 to 8 ounces each)
Kosher salt and freshly ground black pepper to taste
2 tablespoons unsalted butter
2 small zucchini, peeled and diced into 1/4-inch cubes
2 garlic cloves
2 tablespoons chopped fresh basil
Lime wedges, for serving

Directions:
Season the salmon with salt and pepper. In a large skillet over medium-high heat, melt the butter. Cook until the foam subsides and the butter turns deep gold in color, about 2 minutes (watch it carefully to see that it does not burn).

Add the salmon to the pan, skin-side up. Cook, without turning, for 2 minutes. Add the zucchini and a pinch of salt to the pan around the salmon; stir to coat it with butter. Continue to cook, stirring the zucchini, until the underside of the fish turns dark golden, about 3 minutes longer. Flip the fish (push the zucchini to one side of the pan so that the fish can make contact with the pan). Add the garlic to the zucchini and stir. Cook the fish until done to taste, 2 to 4 minutes longer.

Stir the basil into the zucchini in the pan. Taste and adjust the seasonings, if necessary. Spoon the zucchini and butter sauce over the fish and serve with lime wedges, encouraging people to squeeze them. This needs a tiny bit of acid to bring out all the flavors.


Wednesday, July 11, 2012

Fried Zucchini Blossoms


Last weekend, I happened to be near the Union Square greenmarket at the ungodly (for a Saturday, at least) hour of 6:30 a.m. right when all the farmers are setting up their stands for the day. Usually, I'll make it there by 11 or so, and all the particularly in-demand produce is long gone. Think rhubarb, garlic scapes, and the like. And so, I decided to take advantage of the situation and take a stroll through. When I spotted a bin full of bright golden orange zucchini blossoms at Lani's Farm, I jumped on them faster than I thought humanly possible pre-caffeine.

Zucchini blossoms have a fleeting season in the summer, but while they're here, I eat them often and with relish. I love frying them up plain and serving them to guests straight out of my cast iron pan, piping hot and ultra-crisp. Sometimes, I'll take the extra step to stuff them with ricotta cheese before laying them carefully into the hot oil, but only when I'm feeling fancy. This recipe, found on BonAppetit.com produces a perfect light batter. Happy summer, indeed. xo

Fried Zucchini Blossoms
Makes about 24 blossoms 
Ingredients:
Vegetable oil (for frying)
1 1/4 cups all-purpose flour
1 teaspoon kosher salt
12 ounce chilled Pilsner, lagerstyle beer, or club soda
Zucchini blossoms (stamens removed; about 2 dozen)
Sea salt

Directions:
In a large pot, heat about 2" oil over medium heat until a deep-fry thermometer reads 350°. Combine flour and salt in a medium bowl, then whisk in beer until almost smooth (some small lumps are welcome—don't overwhisk or you'll deflate the batter). One by one, dredge the blossoms in batter, shaking off the excess; gently lay them in the oil, without crowding the pan. Cook, flipping once with a slotted spoon, until golden brown, 2–3 minutes total. Transfer to paper towels to drain. Sprinkle with sea salt and devour while hot.

Monday, July 9, 2012

Weekend Bits


Just a few Instagram shots from the weekend in Montauk--I was out there for five full days, which was bordering on heavenly. Lots of bbqs, delicious dinners, bottles of rose, hours and hours on the beach, mini dance parties, Ruschmeyer's breakfasts, and yoga classes were had. Can't wait to get back there. Hope everyone is back to work today thoroughly relaxed and recharged. xo


Tuesday, July 3, 2012

Happy Fourth!


Wishing everyone a healthy, happy fourth of July! I'll be in Montauk until Sunday hitting Ditch Plains, laying around at Ruschmeyer's and Sole East, eating lots of BBQ, and hopefully getting in some yoga at Love Yoga. See y'all on Monday. xo

Chewy Sugar Cookies


Here's a sweet little post to take you into the holiday. Everyone needs a solid recipe for classic sugar cookies--it's one of the only desserts that just about everyone can't help but like, and the cookies can serve as the base for lots of other delicious things, like mini ice cream sandwiches. I found this recipe on one of my favorite sites, Food52, and I have to say, it turns out a pretty great cookie. Lots of crunch, lots of chew, not too sweet, and the turbinado sugar gives them a fun sparkle. Picture by Mark Iantosca. xo


Chewy Sugar Cookies
Makes about 2 dozen cookies 
Ingredients:
1/2 cup unsalted butter, room temperature
1/2 cup granulated sugar
1/4 cup light brown sugar
2 teaspoons vanilla extract
1 large egg
1 1/2 cup all-purpose unbleached flour
1/2 teaspoon sea salt
1/4 teaspoon baking soda
1 cup turbinado sugar, or coarse sugar

Directions:
Preheat oven to 375 degrees F. Line two large sheet pans with parchment paper. Cream butter and sugars for 1 minute. Scrape sides of bowl. Continue beating for another minute. Scrape bowl again.

Add vanilla. Beat for 1 minute. Scrape sides of bowl. Add egg. Beat for 1 minute. Scrape sides of bowl. Add flour, salt and baking soda. Beat 1 minute. Scrape sides of bowl and beat for another minute.

Place course sugar in small, shallow bowl. Using a small cookie/ice cream scoop (mine is 1 ½“ in diameter), scoop balls of dough and drop a few at a time in the course sugar and gently roll around. Place balls of dough on parchment, leaving about 1 ½“ space around each. My pans fit 12 cookies very comfortably.

Do not press the balls down. This will ensure a chewy middle. Bake for 8 - 10 minutes, turning and reversing pans midway through baking. Resist the urge to bake your cookies longer, or they won’t be chewy. The tops don’t get much color, but the bottoms will be nicely golden.

Place pans on cooling racks. When cool, store cookies in air-tight containers.